Patient misidentification is a frequent source of harm for patients in hospitals and other healthcare facilities. Loss of specimens can result in unnecessary surgical procedures, such as additional tissue biopsies. Though the typical rate of mislabeled specimens is approximately 0.1% of all pathology specimens, it remains high enough to harm the many relying on their healthcare system to manage illness.1
The storage of microscope slides is a necessary step in the management of patient samples as well as research laboratory workflows. Here, several steps can be implemented to generate a highly organized system for microscope slides, reducing the likelihood of misplaced or misidentified samples as well as the rate of human error.
Employ the right containers
Selecting appropriate containers used to store slides will depend on the volume of slides in your workflow as well as the container’s function. File folders are ideal for general lab storage of a small number of slides, typically holding up to 20 slides. Slide boxes can be used for larger volumes (up to 100 slides) if longer-term storage is necessary. If the slides are stored in deep-freeze conditions, it’s worth investing in boxes with a grooved outer surface to ensure that condensation doesn’t make them slippery. Freezer racks can also be used for larger volumes of slides stored in extremely low temperatures.
Slide storage cabinets are essential for labs that process hundreds of slides daily. Some cabinets can be stacked on top of one another, ensuring that as the number of microscope slides grows, so too does the storage capacity of the lab.
When transporting slides, slide mailers provide a reliable solution to protect the slide; these come in either plastic or cardboard in addition to a variety of different formats, including plastic flip-top or screw-cap mailers. For slide staining, staining jars like the Hellendhal or Schifferdecker models are often recommended to provide a leak-proof and humid-proof environment.
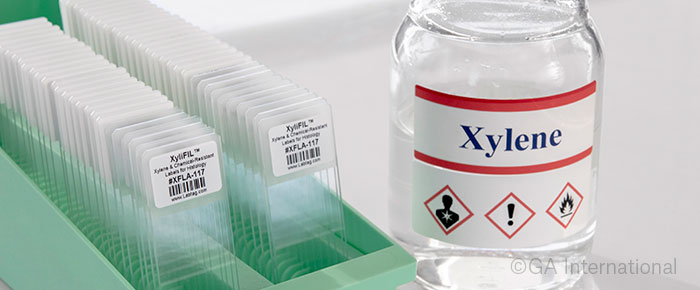
Use an appropriate labeling method
Without labels, tracking and tracing all microscope slides in a lab that stores hundreds or more of them would be nearly impossible. Writing directly on the slide is not recommended; instead, xylene- and chemical-resistant microscope labels should be used to ensure the label does not fall off, regardless of whether the staining procedure calls for xylene, a xylene substitute, acetone, or methanol. These labels are often adaptable for cold storage as well, resisting temperatures as low as -80°C.
When working in a lab that frequently processes microscope slides from other facilities and/or departments, patent-pending Histo-PinTAG™ labels are a practical and user-friendly option. These labels are designed to cover the existing 2D barcode while, at the same time, providing new information to the slide. The circular portion of the label covers the 2D barcode, while the rectangular section, containing a new barcode, can be placed just below the original label. These labels come with a removable adhesive, so the label can be cleanly removed without damaging the original label or leaving behind any residue.
When printing labels, it is recommended to use a thermal-transfer printer. This ensures that the label has optimal protection against chemical exposure and abrasion.
Store your inventory digitally
Labs have largely shifted to a digital environment within the last decade, mainly because it provides a platform for enhanced tracking and tracing of samples and reagents. Utilizing barcodes with or without RFID labels, it’s possible to accurately and consistently identify every single specimen throughout the entire workflow, from processing to storage and delivery, marking its exact location for each step. Barcodes and RFID have their own pros and cons, but utilizing both simultaneously provides enhanced redundancy that helps prevent microscope slide misidentification.
Cloud-based laboratory information management systems (LIMS) or inventory management systems are the software of choice for most looking to manage their bank of slides. In conjunction with barcodes/RFID, each specimen can be identified with all relevant data, including patient identifiers, relevant dates, tissue type, as well as data on any previous processing and staining.
Rotate your inventory regularly and avoid humidity
This is true for the storage of unused charged/adhesive slides, such as those treated with poly-L-lysine or other coatings. These slides should be used within a year, with a reduction in performance observed after that, and excess humidity should also be avoided for best results. Storing slides next to solvents should also be avoided, as this may cause the slides to become hydrophobic.
Stained slides should also remain in a dark, temperature-controlled environment. This reduces their fading over time, which is crucial for slides carrying patient specimens. They also have a shelf life. Thus, extensive slide collections should be continually monitored, ideally using a LIMS or inventory management system, and old slides should be purged, if necessary. In some cases, like in pathology labs, there are minimum requirements for storing slides; histopathology slides must be kept for at least ten years, while cytology slides must be kept for at least five years.2
LabTAG by GA International is a leading manufacturer of high-performance specialty labels and a supplier of identification solutions used in research and medical labs as well as healthcare institutions.

Reference:
- Dunn EJ, Moga PJ. Patient misidentification in laboratory medicine: a qualitative analysis of 227 root cause analysis reports in the Veterans Health Administration. Arch Pathol Lab Med. 2010 ;134(2):244-255
- Gallik S. How to Store Pathology Slides. 2022. Available at: https://stevegallik.org/how-to-store-pathology-slides/. Accessed July 2023.

