Gram staining is one of the oldest and most commonly used techniques in bacteriology. Dating back to 1884, gram stains were used for the phenotypic characterization of bacteria, helping differentiate classes of bacteria based on the structure of their cell wall. While relatively simple to perform, there are several labeling best practices that can help reduce errors along the way, providing an increased ability to track and trace samples as well as ensuring that labels do not fail throughout the staining protocol.
Bacterial culture
Prior to gram staining, a sufficient quantity of bacteria is needed to test. Typically, bacterial cultures are grown in sterile flasks and petri dishes. When autoclaving flasks, it is recommended to use heat-resistant autoclavable labels capable of withstanding temperatures up to +121°C/+250°F and pressures up to 17 psi, both of which are needed to ensure the sterility of the containers. Removable autoclave labels should be considered if the flasks are washed and re-used often. Autoclave indicator tape is also recommended to verify that the materials have been adequately sterilized.
For Petri dishes, clear cryo labels are ideal for identifying the sides and/or bottom of the plate. Using transparent labels with mirror-image printed (horizontally flipped) text and barcode, the information can be easily read and/or scanned through the bottom of the plate. Note that it is not recommended to solely identify the lid of the petri dish. Lids can be accidentally swapped when working with cultures, whereas labeling the bottom or side of the dish ensures that the plate does not become mislabeled.
A typical gram stain protocol
Heat fixation is the first step to generating bacterial gram stain microscope slides. Typically, slides can be passed over a heat source by holding the edge of the slide with forceps. However, should the slide be left in a heated oven or incubator, verifying that the labels resist exposure to high temperatures is recommended.
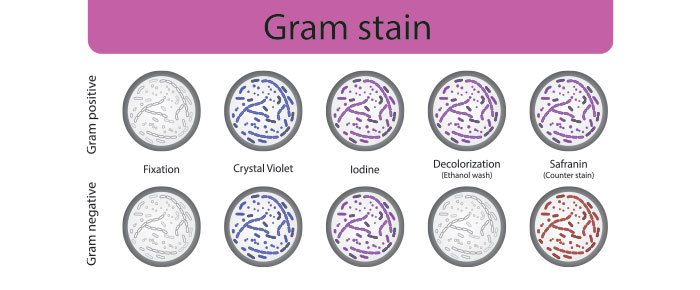
Once cells have been cultured and heat-fixed to the microscope slide, a series of stains and counterstains are needed to determine the nature of the bacterial cell wall. The primary stain, crystal violet, is typically applied to the slide for one minute, followed by a mordant iodine solution, a decolorizing agent (usually ethanol or a mix of ethanol and acetone), a safranin counterstain, then water. General purpose labels are not recommended for this protocol, as these labels are not made to withstand immersion in liquids, let alone harsh stains. Instead, chemical-resistant labels should be utilized for all gram stains as they can resist solvents as harsh as xylene and toluene, as well as a variety of chemical stains. Printouts should be made using a thermal-transfer printer, as they provide optimal resistance against chemical exposure, including stains, as well as smudging and abrasion.
Tracking and tracing slides
Tracking and tracing samples is an integral part of any lab. To optimize sample tracking, implementing a laboratory information management system (LIMS) is highly recommended. Most current systems are cloud-based, which provides additional security and flexibility regarding data collection and access, scheduling workflows, and analysis. A LIMS (or an inventory management system) also provides a platform for tracking sample and reagent location along with other data, including the volumes of reagent remaining, lot number, and number of thaw cycles.
The best way to integrate sample workflow with a LIMS is through barcode and/or RFID labels. Each labeling method has its own pros and cons:
RFID
Pros:
- Scan multiple items simultaneously
- No need for a direct line-of-sight
- Can be used alongside barcodes using an RFID printer
- Provides high level of security
- Tags can be re-encoded
- Can be adapted to almost any label
Cons:
- Requires more testing to ensure the system works efficiently
- Higher cost
- Limited readability in liquids or near metal
Barcodes
Pros:
- Lower cost
- International standards available
- Barcode grading available
- Quicker to test and implement
- Can be adapted to any label
- Multiple types of barcodes afford adaptability based on workflow
- Can be printed using a variety of different types of printers
Cons:
- Labels can’t be re-used
- Lower level of security
- Individual labels must be scanned using direct line-of-sight
The choice to use either RFID and/or barcodes should be made based on each lab’s specific needs. Typically, RFID is recommended for labs that handle a high volume of samples and reagents, whereas barcodes provide an efficient tracking method for smaller workflows. Regardless of which method is chosen, it is essential to test the method prior to full implementation. This ensures that the labels for gram stains do not fail throughout experimental protocols as well as storage, and that the tracking method is feasible to use for all staff throughout the lab.
LabTAG by GA International is a leading manufacturer of high-performance specialty labels and a supplier of identification solutions used in research and medical labs as well as healthcare institutions.

Reference:
- Buxton R, et al. Gram Stain Protocols. American Society for Microbiology. 2016.

